This is sooo good that I ate it up before taking a pic! Very easy and you can customize it to your liking!
Ingredients:
4 large potatoes, cubed
2 carrots, chopped
1 onion, chopped
2 celery stalks, chopped
2 spicy peppers, finely chopped (optional, I like spicy)
1 container of low sodium chicken stalk
2 cups of water
1 can nonfat evaporated milk
Cayenne pepper (optional)
chedder cheese (optional)
Turkey bacon, chopped (optional)
In a crockpot combine the potatoes, carrots, onion, celery, peppers, chicken stalk, water and cayenne pepper. Cook in high for 3-4 hours. Stir in evaporated milk, and cook on low for 30 minutes. This is optional but I think makes the soup, take an immersion blender and blend the soup to create a thicker consistency. When ready to eat, sprinkle the cheese and crispy turkey bacon and enjoy! If you have any leftover, freeze and save for later.
Monday, December 19, 2011
Tuesday, October 11, 2011
Easiest Acorn Squash
So, in case you noticed the two acorn squash halves in the background of the soup picture... We've been getting fresh squash in our CSA deliveries the past four weeks. And, it was my turn for Acorn, so I broke out an oldie but an EASY!
"Roasted" squash in 7 minutes flat...
Easiest Acorn Squash
Ingredients
1 acorn squash, halved and seeds scraped out and removed
2 tbsp margarine
2 tbsp pure maple syrup
Instructions
Lay both halves of the acorn squash with the cavity facing up. Use 1 tbsp of margarine on each half, and spread around the cavity. Drizzle 1 tbsp maple syrup on each half, and cover with plastic wrap tightly. Put both halves in the microwave and microwave on high for 7 minutes. Remove from microwave carefully (they'll be really hot!), and cut the saran wrap from around the squash. Place each half in it's own bowl. Serve in the bowl, and use a fork to scrape the squash from the skin and into the melted butter and maple syrup to eat!
Mark was scared to death of it at first, but ended up raving about it. I think we'll have to get more acorn squash... :)
Tortellini, White Bean, and Spinach Soup
I saw this recipe in Cooking Light, and thought it sounded like a hearty, simple soup. I couldn't help but tweak it, because basically I don't know how to not tweak recipes... And, I know Mark doesn't like artichokes, so I made a few minor adjustments... It was delicious and easy... AND around 280 calories a serving! Can you beat that?

Tortellini, White Bean, and Spinach Soup
Ingredients
1 tsp olive oil
2 c chopped onion
1/2 c chopped red pepper
2 tsp dried Italian seasoning
1 tsp dried basil
3 tsp minced garlic
2/3 c water
1 (16 oz) can small white navy beans, rinsed and drained
3 c chicken broth
1 (14.5 oz) can whole peeled tomatoes, undrained and chopped
1 (8 oz.) bag prepared four cheese tortellini
1 1/2 c coarsely chopped spinach
1/4 c grated fresh parmesan
salt & pepper, to taste
Instructions
Heat olive oil in a large pot over medium high heat. Add chopped onion, bell pepper, Italian seasoning, basil, and garlic; saute 5 minutes or until tender. Add the water, beans, broth, and tomatoes and heat through. Turn heat to low.
Bring a medium pot of water to a boil, and add prepared tortellini. Boil for 10 minutes and drain. Add the tortellini to the soup, and then add the spinach. Cover and return heat to medium high until soup is heated through. Add salt & pepper to taste. Sprinkle parmesan on top.
Serves 6. Enjoy!
Saturday, October 1, 2011
Bacon, Egg, and Toast Cups
A little over a month ago, I saw these delicious little breakfast delights on Pinterest and knew they were a "must pin". The recipe comes from The Girl Who Ate Everything originally, and is so perfect, you do not need to adjust a thing. They are amazing!

NOTE: This recipe is for 6, but you just can make as many or as few as you want. You just select your quantity, and then you need that many pieces of bacon, bread, and eggs...
Ingredients:
6 slices of bacon, uncooked
6 slices of bread (I've had great success with whole wheat white bread.)
1/2 c shredded cheddar cheese (I've varied the type of cheese, and I never measure it...)
6 eggs
salt & pepper, to taste
Instructions:
Preheat the oven to 400 F. Spray the cups of a muffin tin with cooking spray.
Cook your bacon in a frying pan for about 5 minutes, so that it is partially cooked, but not crispy. Transfer to a paper towel lined plate when finished.
While the bacon cooks, cut out circles in each piece of bread using a cookie cutter or a drinking glass turned upside down.
Here's where it gets a little tricky. I have the best results when I push the bread into the muffin cups to shape them gently, but then I take them back out. Wrap the bacon around the muffin cup, and then replace the shaped bread inside the bacon. I kind of shimmy the bacon up a little and shape the bread to the inside of the bacon on the sides and into the bottom of the tin.
When you've got your cups ready, sprinkle cheese on top of the bread. Then, crack one egg over each piece of bread. I do this over the sink, with the muffin tin just to my right. You may not want to use all of the egg white, so it's easier to crack the egg and let a little of the white run out into the sink and then pour the egg into the cup. You can use the whole white, but it sometimes bubbles over the bacon when you do that.
Bake until eggs are cooked through to your liking and the bacon is crispy. We've found 15 minutes is perfect if you don't use the full white and you like your eggs with a little bit of run in the yolk. Run a knife around the outside of the bacon in the muffin cups, and pop them out. I use a fork on one side, gently sliding between the bacon and the tin, and a knife on the other side to pull them out...
Salt & pepper for seasoning, and enjoy! We love these. They are the perfect breakfast bite!
Thursday, September 29, 2011
Roasted Butternut Squash with Sauteed Lentils
What did I find on Pinterest this week? I found The Sprouted Kitchen, and the recipe for Sauteed Beluga Lentils + Butternut Squash. Jackpot! We got butternut squash in our CSA last week, and I was looking for something different. I didn't make it exactly according to the recipe, though I admit the recipe there looks a LOT prettier than what I came up with. But, I had green lentils on hand, and fresh farm yellow onion... So, I made some adjustments based on what I had on-hand. I also made it for half the size, because it's just the two of us here... So, here's what turned into delicious!
Ingredients
2 c Butternut squash, peeled and cubed
1 Tbsp olive oil
1/4 Tbsp curry powder
1/4 Tbsp oregano
1/2 Tbsp brown sugar (I used Sugar Twin, a substitute that turned out to work.)
salt & pepper, to taste
1 c cooked green lentils, drained
1 Tbsp minced garlic
1 Tbsp olive oil
3 Tbsp dried basil
4 Tbsp dried parsley
1/2 small yellow onion
1 Tbsp apple cider vinegar
1/2 tsp Dijon mustard
Grated parmesan/romano, to taste
Instructions
Preheat the oven to 450F. Combine the cubed squash, olive oil, oregano, curry powder, and salt & pepper in a bowl and mix to coat the squash evenly. Spread in a single layer, with as much space as possible, on a shallow baking dish. Roast on the top rack for approximately 30 minutes, or until the edges get brown and crispy.
While the squash is cooking, place the olive oil and minced garlic in a pan over medium heat. Stir together and allow the garlic to crisp up in the hot oil. Add the lentils, basil, parsley, and yellow onion and stir to allow even coverage of oil and herbs to the lentils. Continue to stir occasionally, and saute about 10 minutes, or until the lentils are heated through. Turn off the heat, but continue to leave them in the warm pan until the squash is finished roasting.
Remove the squash from the oven and set aside. Take the lentils from the pan and place them into a bowl. Add the apple cider vinegar and dijon mustard. Stir. Place the squash chunks on top, and then add some grated parmesan/romano on top of the lentil mixture. Serve and enjoy! Serves 4.
It's delicious. I can't tell you how amazingly full of great flavor this was. Mark loved it, even though he came into the kitchen while I was cooking it and said "What is that?" in reference to both the lentils and the squash. The recipe says you can do this with ANY squash. I happen to have another in the fridge, so I think I might go get another variety of lentils and try again with new lentils and new squash. If it was this amazing with what I had on hand? YUM.

I'm already looking forward to leftovers.
Sunday, September 25, 2011
Crisp Lentil Salad

Ingredients
1 c brown lentils
3/4 tsp kosher salt
4 c water
4 Roma tomatoes, chopped
1/4 c red onion, chopped
1/4 c red pepper, chopped
1/4 c green pepper, chopped
1/4 c yellow pepper, chopped
3 Tbsp red wine vinegar
2 Tbsp olive oil
1/2 tsp kosher salt
1/4 tsp black pepper
Instructions
Bring the water, lentils, and about 3/4 tsp of kosher salt to a boil over medium high heat. When you've reached a rolling boil, reduce the heat and simmer over medium-to-low heat for approximately 30 minutes when lentils are done. Drain the water from the lentils.
Stir in the vegetables and the vinegar, olive oil, salt & pepper. Chill a few hours, it actually gets better as the lentils soak in the liquid. Serves 6. Very fresh, crisp, and tasty with a nice nuttiness from the lentils.
Wednesday, September 21, 2011
Roasted Corn with Lime, Parmesan and Chili
Have you had the street corn at Milagro in Webster? If not, get there and eat it... I sometimes dream about that corn. I decided to go searching for something slightly similar to make with dinner, but I have an issue... Mark won't eat anything with white, creamy condiments included (mayonnaise, sour cream, cream cheese, ranch dressing, etc.) so I had to find something similar that didn't include any of those things. That's tough...
I landed on this recipe for Roasted Corn with Lime, Parmesan and Chili from Food52, though I still had to substitute yogurt for sour cream and mayonnaise... It would have been better with the sour cream and mayonnaise, but it was good with the yogurt if you have a similar situation...
Roasted Corn with Lime, Parmesan and Chili (Food 52)
Ingredients
3 medium ears of corn
1 1/2 Tbsp olive oil
salt & pepper
1 Tbsp mayonnaise, at room temperature
1 Tbsp sour cream, at room temperature
1/4 c milk, at room temperature
juice of one lime, plus wedges for serving
3 Tbsp grated Parmesan
generous pinch of cayenne pepper
Instructions
Heat the oven to 400 F. Shuck the corn and cut the kernels from the cobs (see tip posted yesterday....), tossing them in a bowl with the olive oil, salt, and pepper. Spread the corn kernels evenly on a large rimmed baking dish and roast in the oven for 15 to 20 minutes, scraping and turning over the kernels once or twice, until they're tender and lightly caramelized.
Put the corn back into the bowl and mix in the mayonnaise, sour cream, milk, lime juice, parmesan and cayenne. Taste and adjust any of the seasonings to your liking. Serves 2
 See? I swear we eat these things with meat... :)
I landed on this recipe for Roasted Corn with Lime, Parmesan and Chili from Food52, though I still had to substitute yogurt for sour cream and mayonnaise... It would have been better with the sour cream and mayonnaise, but it was good with the yogurt if you have a similar situation...
Roasted Corn with Lime, Parmesan and Chili (Food 52)
Ingredients
3 medium ears of corn
1 1/2 Tbsp olive oil
salt & pepper
1 Tbsp mayonnaise, at room temperature
1 Tbsp sour cream, at room temperature
1/4 c milk, at room temperature
juice of one lime, plus wedges for serving
3 Tbsp grated Parmesan
generous pinch of cayenne pepper
Instructions
Heat the oven to 400 F. Shuck the corn and cut the kernels from the cobs (see tip posted yesterday....), tossing them in a bowl with the olive oil, salt, and pepper. Spread the corn kernels evenly on a large rimmed baking dish and roast in the oven for 15 to 20 minutes, scraping and turning over the kernels once or twice, until they're tender and lightly caramelized.
Put the corn back into the bowl and mix in the mayonnaise, sour cream, milk, lime juice, parmesan and cayenne. Taste and adjust any of the seasonings to your liking. Serves 2

Pickled Okra
When I was looking for a recipe to make canned Brandied Peaches, I found the recipe I ended up using at Food & Wine, courtesy of Linton Hopkins. Those peaches were amazing. So, now if it's pickled, brined, or canned, I think I'll just turn there first...
Which is where I found the inspiration for spicy pickled okra, again, courtesy of Linton Hopkins... I didn't follow that recipe exactly, because I already had pickling spice on hand it's comprised of most of what goes into his recipe... So, I'll write this post on how I made it, though I would recommend going to his recipe for the real deal.

Spicy Pickled Okra
Ingredients
1 lb okra, trimmed (which apparently means slicing off the top of the caps and anything else to make them fit)
8 small red dried chili peppers
6 garlic cloves, peeled
1 Tbsp pickling spice
1/2 c cider vinegar
1/2 c water
Instructions
Pack the okra, chili peppers, and garlic evenly into two sterilized pint jars. You'll have to stuff them a bit to make it fit.
Combine the pickling spice, vinegar, and water in a medium saucepot and heat to a boil over high heat. When liquid mixture is boiling, turn off the heat and use a ladle to transfer the liquid over the okra in the pint jars. Leave 1/2 inch at the top for head space. Wipe the mouth of the jars and place the lids and rings on top to close.
Place both jars into a large stockpot and cover with water. Bring water to boiling and the continue to boil the jars for 10 minutes. Remove the jars from the pot and let cool to room temperature.
Makes two pints, and they'll be good for a year... If you wait that long to make a bloody mary with them...
Squash Spaghetti
I have made this one a couple times and each time I do something different, and love it. This version is my favorite but you can easily adapt the recipe for your own preference.
Ingredients:
2 squash, cut in half and seeds removed
LOTS of tomatoes, sliced
Bell pepppers, chopped
1 clove of garlic, chopped
Olive oil
Parmesan cheese
On a foil lined baking sheet place the squash so the "skin" side is on the bottom. Lightly cover each half with olive oil, and bake in the oven at 350 for 15 minutes
 Let the squash cool, and then take a fork and shred the inside. These are your "noodles." Then in a large sauce pan on medium heat saute the tomatoes, peppers, and garlic using a little bit of olive oil. After a few minutes add your squash noodles and then serve warm with Parmesan cheese. If you are not an olive oil fan, you can use any type of sauce and add any of your favorites!
Ingredients:
2 squash, cut in half and seeds removed
LOTS of tomatoes, sliced
Bell pepppers, chopped
1 clove of garlic, chopped
Olive oil
Parmesan cheese
On a foil lined baking sheet place the squash so the "skin" side is on the bottom. Lightly cover each half with olive oil, and bake in the oven at 350 for 15 minutes

Easy Garlic Potatoes
I have seen this on pinterest about 10 times so I figured I would give it a try. It's beyond easy and delicious
Ingredients:
1 potatoe
1 glove of garlic
olive oil
salt and pepper
Slice the potatoe about 3/4s of the way

Then chop up the garlic clove and put a little bit of garlic in each slice. Drizzle olive oil, and then sprinkle with salt and pepper. I also used a bit of lawry's seasoning salt because I thought it sounded good!
Bake at 350 for about 30 minutes and enjoy!

Tuesday, September 20, 2011
Chicken Breasts with Zucchini Pappardelle & Hasselback Potatoes
So, it usually looks like all we eat are vegetables around here, since the purpose of starting this blog was to share what we do with our local veggies delivered from our CSA. However, I promise you (and so does our scale) that we eat full meals. So, I found two recipes on Pinterest that I thought looked amazing - and easy! So, we prepared Chicken Breasts with Zucchini Pappardelle and Hasselback Potatoes. We loved every bite of this meal!
Chicken Breasts with Zucchini Pappardelle (Gourmet, but found at The Bitten Word)
Ingredients
1 pound zucchini, trimmed
2 garlic clove
4 boneless chicken breast halves (I used skinless, but the recipe is with skin on. Go with your preference.)
1 Tbsp olive oil
2 tablespoons water
1 cup torn basil leaves (I went a little lighter than this, because it seemed like a lot of basil to me...)
Instructions
Slice zucchini lengthwise with a slicer or mandoline, and put into a large bowl. Thinly slice garlic and reserve separately.
Pat chicken dry, then cut crosswise into thirds. Season all over with 3/4 tsp salt and 1/2 tsp pepper. Heat olive oil in a 12-inch heavy skillet over medium-high heat until it shimmers. Saute chicken in batches, skin side down first if you used skin, until browned and just cooked through 10-14 minutes total.
Add chicken to the bowl of zucchini.
Place the garlic in the skillet and cook, stirring, until pale golden, about 1 minute. Add water and scrape up the brown bits left on the skillet. Drizzle this mixture over the chicken and zucchini. Add basil and 1/4 tsp salt to the bowl and toss until zucchini wilts slightly. Season with salt and pepper. Serves 4
Hasselback Potatoes (Apparently the swedish version of baked potatoes... Wow - new potato favorite!)
Ingredients
4 large, baking potatoes
4 cloves of garlic, sliced very thin
olive oil
salt & pepper, to taste
dried parsley for garnish
Instructions
Preheat oven to 425 F. Slice the potatoes, from one side to the other, about 1/4 inch apart, but stopping short of going all the way through the potato. Place a thin slice of garlic into each of the cut slices of the potato. Place the potato with garlic onto a baking dish.
Drizzle potatoes with olive oil, and sprinkle with salt, pepper, and dried parsly.
Cook for roughly 40 minutes or until the potatoes are crispy with soft flesh... Serves 4. So good!

Pickled Hot Peppers
I make Italian Beef in the crock pot at least once a month in the winter, and that usually includes chopping some peppers and onions for packing the meat full of flavor. Peppers are so fresh right now, and I had a ton of them! So, I decided to pickle them so that I've got a pint ready to go as when I make the next Italian Beef dinner (probably Sunday, but whatever...)!
Pickled Hot Peppers
Ingredients
1 1/2 pounds of fresh mixed peppers (I used all kinds of hot peppers and also some bell peppers)
1/2 onion, sliced into thin strips
9 cloves of garlic, crushed and peeled
3 cups apple cider vinegar
1 cup water
1 Tbsp pickling spice
3 pint jars with lids and rings
Instructions
Slice all the peppers and trim off ends. If you want them to be milder, you can remove all the seeds. If you want them to be hotter, you can leave all the seeds... I left some in, and took some out for medium heat... To ensure that I had an even mix of pepper types, I used three bowls and distributed each pepper among the three bowls so that I knew I had a good mix in each batch.
Separate the sliced onion into even portions among the three bowls. Put 3 crushed cloves of garlic into each bowl, as well.
I should tell you that I like my peppers a little crisper, so I opted to put them straight into three sterilized pint jars. The jars are packed very tight, and they barely fit - use a spoon to push them down.
In a pot, mix the vinegar, water, and pickling spice and put on the stove on high heat. Bring the liquid mixture to a boil, and then reduce heat to simmer for 5 minutes. Using a ladle, transfer the hot liquid over the pepper mixture in the pint jars, leaving just about a half an inch of headspace in the jars.
Wipe off the rims of all three pint jars, and place the lids and rings tightly on the jars. place the jars into a large stock pot and cover completely with water. Bring the jars to a boil on the stove over high heat, and boil for a total of 15 minutes.
Remove the jars from the hot water, and allow to cool completely. Makes 3 pints. Store in a cool dry place, and refrigerate after opening...

Delicious!
No-Mess Corn Off The Cob
I've been cutting a lot of corn off the cob for use in soups, salads, etc... I got tired of making messes, and came up with this little trick. I thought you might find it handy if you don't already do this...
You just need a bowl, a flat tupperware or a shallow baking dish, a knife, and the corn...
Turn the bowl upside down inside the shallow dish, and rest your corn on the cob on top of the bowl...

Then just take the knife and cut the kernels off the cob.... And, they fall miraculously into the shallow dish, instead of all over your counters!
 Hope you find this handy!
You just need a bowl, a flat tupperware or a shallow baking dish, a knife, and the corn...
Turn the bowl upside down inside the shallow dish, and rest your corn on the cob on top of the bowl...

Then just take the knife and cut the kernels off the cob.... And, they fall miraculously into the shallow dish, instead of all over your counters!

Roasted Garlic & Crash Hot Potatoes
We got a lot of potatoes and garlic in the late summer with our CSA. So, I was looking for creative ways to eat both, and I found amazing potato inspiration on Pinterest. The first discovery was "Crash Hot Potatoes, which I found at The Pioneer Woman cooking blog. I have to tell you - the potatoes looked great, but I mostly loved the personality in her writing. So, I added Crash Hot Potatoes to the list of things to make with my potatoes. She mentions in the recipe that she changes the herbs based on what she has available... Which is where...
...the Roasted Garlic comes in! Roasted Garlic is amazing by itself on toasted bread, especially with pasta... Mmmm... Now I'm thinking about garlic bread, which I have not yet made. I'm digressing. Back to...
Roasted Garlic
Ingredients
1 whole garlic bulb
2 tsp olive oil
Instructions
Preheat oven to 400 F. Cut the tops off the garlic bulb, exposing the tops of the individual cloves inside. Place the garlic bulb into a baking dish and coat the garlic bulb with approximately 2 tsp olive oil. Use your fingers to make sure the bulb is fully coated.
Cover with aluminum foil, and place into the preheated oven for 35 - minutes, or until the garlic is soft to the touch.
Allow it to cool, and then cut the garlic skin away from the cloves so that you can pull the garlic out. It should be so soft that you could spread it. That means it's done. (And it smells amazing.)

Crash Hot Potatoes (Mostly pulled from The Pioneer Woman, with a couple variations...)
Ingredients
6 small whole new potatoes (or other small round potatoes)
1 1/2 Tbsp Olive Oil
kosher salt and pepper, to taste
roasted garlic, to taste
Instructions
Preheat the oven to 450 F. Bring a pot of salted water to a boil. Add your potatoes to the boiling water and cook them until they are fork tender (at least 10 - 15 minutes). When they are easy to pierce with a fork, remove them from the water.
Drizzle olive oil on a sheet pan and place the potatoes on the oiled cookie sheet, leaving room between the potatoes. Use a potato masher (this was important, as the slotted spoon I used made them erupt more than mash.) to slightly mash the potato, then turn 90 degrees and mash again.
Brush the tops of the crushed potatoes with more olive oil. Sprinkle salt and pepper, and place some roasted garlic on each potato. (The Pioneer Woman used rosemary - I think you can use any herb you want).
Bake at 450 for 20-25 minutes until golden brown. Serves 6. Enjoy! Yum. Mine weren't as pretty as hers, but they were yummy!

I found Pinterest...
So, it's been a while... That's because I found Pinterest. I wish I was kidding, but I'm not. I have been pinning like mad for a month or so. The good news? Much of what I've pinned has been food, and it has inspired me to try some different things. So, some of the next posts will include my Pinterest finds... I'll tell you where they came from, don't worry! :)
Saturday, August 20, 2011
Easy *Peach Cobbler
I asterisked the "peach", because I think this would be great with any fruit... Next time I'll do it with berries or apples, or whatever comes... (adventures in CSA!)
Ingredients
1/4 c butter
1/4 c margarine
6 peaches (Next time, I will try 10 because I thought it could take more fruit, but I haven't done it so won't swear to it here...)
1/4 c orange juice
1 1/4 c sugar, divided into 1 c and the other 1/4 c
1 c flour
1 c milk
2 tsp baking powder
1/4 tsp salt
nutmeg
brown sugar
Instructions
Preheat the oven to 400 degrees.
Melt the butter and margarine in a baking dish. I used a round baking dish, but the standard square seems like it would work, also.
Bring a pot of water to a boil on the stove, and drop your peaches into the boiling water for about 30 seconds. Remove with slotted spoon. Peel the peaches, halve them, remove the pits and cut them into wedges.
Return your peaches to the saucepan and add the orange juice to the peaches. Bring to a boil over medium-high heat. Remove from the heat.
Combine 1 c sugar, flour, milk, baking powder and salt in a bowl. Mix until even and smooth. Pour over the melted butter in the baking dish.
Use a slotted spoon to add the peaches to the top of the cobbler mixture. When all the peaches have been added, sprinkle the top with the remaining 1/4 c sugar, and then dust with nutmeg and brown sugar.
Bake for 30 minutes at 400 degrees, and ensure is finished by using a toothpick to test. It's ready when it tests clean...


Serves 6. AND IS GREAT. Mark likes peaches now, and even said he wished there were more peaches. So, I would double fruit in this recipe if I make it again... :)
Brandied Peaches
I do not take any credit for this recipe. I followed it exactly as it was posted at Food & Wine... The only thing I did was divide the recipe by 4. The original recipe makes two quarts, and I only wanted 2 pints. (2 pints = 1 quart / See, my time working at Baskin-Robbins all those years ago was well-spent.)
We had so many peaches, and I was looking to preserve some so that they did not go bad... I also have a lot of brandy in the house, since I haven't made my sangria all summer.
Which totally reminds me that my sangria is the most amazing sangria in the world. Why haven't I made my sangria this year??? Moving on, while making a mental note to also bring all sangria-making-instruments on vacation with us...
If you are new to canning, you will not realize that you need to sterilize your jars, lids, and rings. You can either heat up a pot of water to just under boiling and keep them in it until you are ready go to... Or, you can use the "sanitize" cycle on your dishwasher if you have one... Just FYI - the recipe didn't say this, but you need sterile jars.
Ingredients
1 1/2 pounds peaches
3/4 c water
1 c sugar
1 c brandy
Instructions
Bring a pot of water to a boil over very high heat. Drop in whole pieces for about 30 seconds, and then remove to a bowl or baking dish. Let cool just enough to peel the skin off the peaches. It comes over very easy at that point, and then you can halve them and pull out the pits. I actually cut them in quarters, because my peaches were kind of large...
Bring the water and sugar to a boil in a saucepan over medium high heat, and allow to reduce for about 5 minutes after it comes to a boil.

Add the peaches to the boiling syrup, and bring the peaches to a boil in the syrup. As soon as you've reached boiling, use a slotted spoon to remove the peaches to your jars. (This quantity will yield 2 pints.)


Then, add the brandy to your syrup and again return to a boil. When the brandy syrup is boiling, use a ladle to fill your peach jars up with the brandy syrup. Then, use a wet rag to clean the tops of your jars and add the lids and rings. Allow to cool to room temperature, and refrigerate.

Brandied peaches are good for three months in the refrigerator.
I'll update the comments with my feedback on flavor after vacation! :)
Millions of peaches...
We started getting peaches in our CSA three or four weeks ago. I love peaches. But, Mark wasn't sure if he liked them, but didn't think he'd ever eaten one... So began the search for the perfect peach dessert. In the end, I'm always looking at all kinds of recipe ideas. So, nothing ever seemed good enough to convince him that the peach is good.
Long story short. I hesitated. I procrastinated. I hoped the perfect idea would come.
It didn't.
So, instead, I made the next two recipes because I was afraid they would go bad while I stalled... I haven't tried the Brandied peaches yet. We decided to take them on vacation with us in two weeks (they're canned and good for three months) to eat while watching the sunset with ice cream... The other is a solid recipe that I think you could swap any fruit in or out of and have a pretty simple, tasty, cobbler...
Friday, August 19, 2011
Bread & Butter Pickles
My Grandma Howard used to make Bread & Butter pickles, and my mom used to love them. But, unfortunately, my Grandma Howard died well before her time... So, my mom hadn't had those pickles since 1980. She recently found a cookbook that belonged to my Grandma, and lo & behold.... There was one dirty, well-worn page that just happened to be a recipe for Bread & Butter pickles. She came to visit me, and we made them to see if they were the same. Success! The pickles are delicious!
Ingredients
1 1/2 c salt
1 gallon water
8 medium-to-large cucumbers, sliced thin
1/4 of a white onion, chopped
1/2 c of chopped bell peppers
5 c cider vinegar
5 c sugar
2 Tbsp mustard seed
1 tsp turmeric
1/2 tsp ground cloves
Instructions
Combine the salt and water to make a brine... I needed two large mixing bowls to hold all of this. Add the cucumber slices and chopped onion and bell peppers to the brine mix and let stand 3 hours. Drain.

Combine the vinegar, sugar, and spices in a large stock pot or preserving kettle and bring the mixture to a rolling boil.
 Add the drained cucumbers and heat thoroughly, but do not boil the pickles.

Using a slotted spoon, remove the pickles into sterilized pint jars while they are still very hot. Pack them in very tight and use a ladle to spoon the liquid into the jars to fill. Seal at once, and allow to cool to room temperature.

Ingredients
1 1/2 c salt
1 gallon water
8 medium-to-large cucumbers, sliced thin
1/4 of a white onion, chopped
1/2 c of chopped bell peppers
5 c cider vinegar
5 c sugar
2 Tbsp mustard seed
1 tsp turmeric
1/2 tsp ground cloves
Instructions
Combine the salt and water to make a brine... I needed two large mixing bowls to hold all of this. Add the cucumber slices and chopped onion and bell peppers to the brine mix and let stand 3 hours. Drain.

Combine the vinegar, sugar, and spices in a large stock pot or preserving kettle and bring the mixture to a rolling boil.


Using a slotted spoon, remove the pickles into sterilized pint jars while they are still very hot. Pack them in very tight and use a ladle to spoon the liquid into the jars to fill. Seal at once, and allow to cool to room temperature.

Saturday, August 6, 2011
Corn Chowder with Potatoes & Carrots
We got a great load of vegetables last week... Fresh corn, teeny tiny carrots, red potatoes, onions, etc... We've already done corn on the cob, so I went for Corn Chowder instead! It was well worth the effort - very tasty!
Ingredients
5 ears of corn, shucked
4 medium red potatoes, peeled and cubed
1/2 c carrots, peeled and diced
1/2 c diced celery
1/4 c diced red onion
Approximately 5 c chicken broth (enough to cover the vegetables in the pot)
1/4 c butter
1 c half & half
1 c skim milk
1/4 c flour
1/2 tsp hot sauce
1/4 tsp cumin
salt & ground pepper to taste
2 c shredded CoJack
Instructions:
Bring a large pot of water to a boil, and drop corn into the boiling water. Let corn boil for five minutes, and remove corn from the pot. Rinse out the pot, while allowing the corn to cool.
Return the pot to the stove, and add all the vegetables (except the corn) to the pot. Cover with chicken stock, and bring to a boil. Once it boils, reduce heat to a simmer and continue to cook for about 25 minutes or until potatoes and carrots are tender.

Cut the corn off the cob while the vegetables cook.
In a small pot, combine the butter, milk, half & half, flour, hot sauce, and cumin. Stir until the mixture is creamy, but don't allow it to stick to the bottom. Add salt & pepper to taste.
Combine the milk mixture with the vegetable mixture, and add the corn and cheese. Stir constantly until the cheese is melted into the mixture. Using an immersion blender, blend about half of the soup to add to the creamy consistency, but leaving some of the rustic chunks! Enjoy. Serves 6.
 Still kind of shocked I had all these ingredients in the house... :)
Ingredients
5 ears of corn, shucked
4 medium red potatoes, peeled and cubed
1/2 c carrots, peeled and diced
1/2 c diced celery
1/4 c diced red onion
Approximately 5 c chicken broth (enough to cover the vegetables in the pot)
1/4 c butter
1 c half & half
1 c skim milk
1/4 c flour
1/2 tsp hot sauce
1/4 tsp cumin
salt & ground pepper to taste
2 c shredded CoJack
Instructions:
Bring a large pot of water to a boil, and drop corn into the boiling water. Let corn boil for five minutes, and remove corn from the pot. Rinse out the pot, while allowing the corn to cool.
Return the pot to the stove, and add all the vegetables (except the corn) to the pot. Cover with chicken stock, and bring to a boil. Once it boils, reduce heat to a simmer and continue to cook for about 25 minutes or until potatoes and carrots are tender.

Cut the corn off the cob while the vegetables cook.
In a small pot, combine the butter, milk, half & half, flour, hot sauce, and cumin. Stir until the mixture is creamy, but don't allow it to stick to the bottom. Add salt & pepper to taste.
Combine the milk mixture with the vegetable mixture, and add the corn and cheese. Stir constantly until the cheese is melted into the mixture. Using an immersion blender, blend about half of the soup to add to the creamy consistency, but leaving some of the rustic chunks! Enjoy. Serves 6.

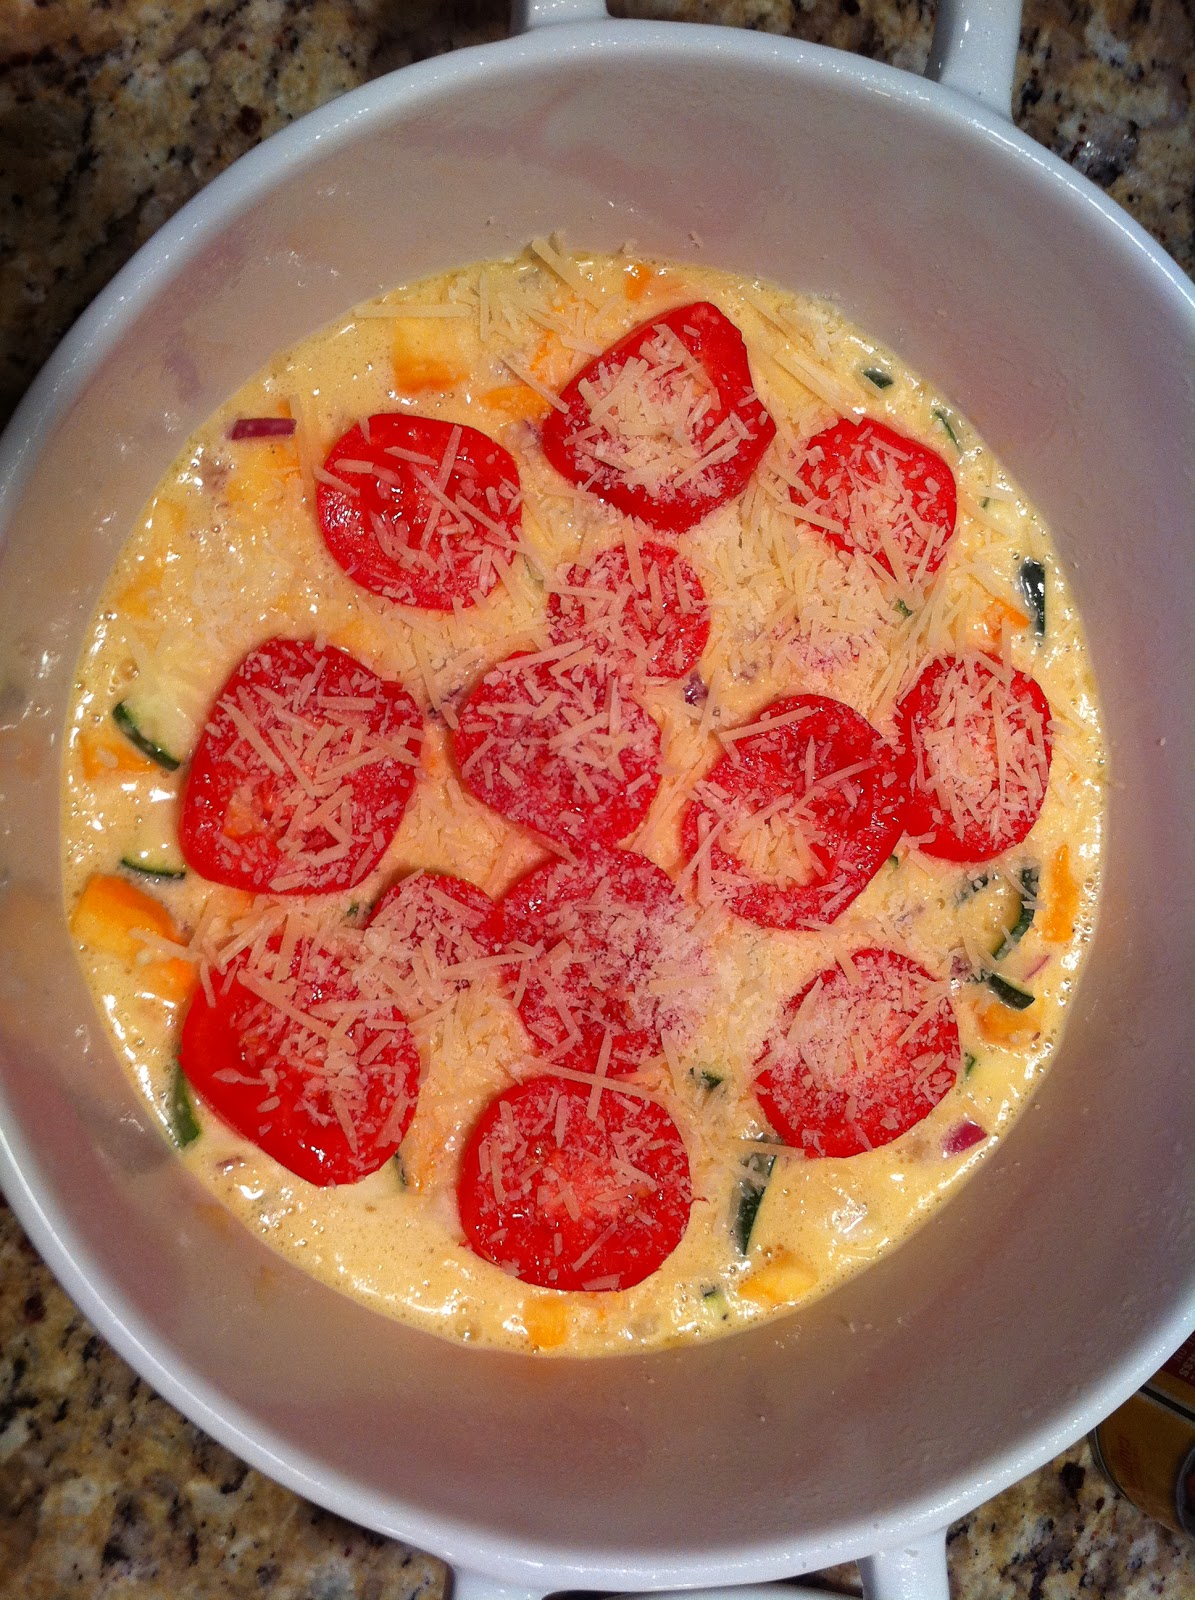
Zucchini & Yellow Squash Quiche-ish
It isn't really a quiche, but I didn't know what else to call it, to be honest... My mom was coming to visit for the weekend, and she got stuck in traffic for over an hour... I knew she would be ready to eat when she finally made it and she's usually game for trying something new - plus she likes squash!
Ingredients
1 medium-large zucchini, halved and sliced
1 large yellow squash, halved, seeded and sliced
1/2 of a small red onion, diced
2 Roma tomatoes, sliced
4 eggs (We get a dozen of Dry Dock Farms fresh eggs each week, so this was a no-brainer!)
1/4 c olive oil
1 tsp baking powder
1 c baking mix (like Biscquick)
Grated parmesan
salt & pepper to taste
How to:
Preheat the oven to 350 degrees. Grease a 9-inch round baking dish.
Prepare your vegetables and add salt and pepper to taste.

Whisk together the eggs with the oil until they are nice and fluffy. Mix in the baking powder and baking mix until it's combined evenly. Then, fold the mixed vegetables into the egg mixture. Pour into the baking dish and top with the tomato slices. Sprinkle grated parmesan over the top, and place into the oven to bake.

Bake for 40 minutes, or until it starts to brown and eggs appear cooked through.
This was our main course, so it only served four big pieces... And, I should have taken a picture before we dug into it. But, we were hungry - it was 9:00 p.m.! :) I'll make this again, and may even try it with different vegetables. It seems like any combination would work!

Ingredients
1 medium-large zucchini, halved and sliced
1 large yellow squash, halved, seeded and sliced
1/2 of a small red onion, diced
2 Roma tomatoes, sliced
4 eggs (We get a dozen of Dry Dock Farms fresh eggs each week, so this was a no-brainer!)
1/4 c olive oil
1 tsp baking powder
1 c baking mix (like Biscquick)
Grated parmesan
salt & pepper to taste
How to:
Preheat the oven to 350 degrees. Grease a 9-inch round baking dish.
Prepare your vegetables and add salt and pepper to taste.

Whisk together the eggs with the oil until they are nice and fluffy. Mix in the baking powder and baking mix until it's combined evenly. Then, fold the mixed vegetables into the egg mixture. Pour into the baking dish and top with the tomato slices. Sprinkle grated parmesan over the top, and place into the oven to bake.
Bake for 40 minutes, or until it starts to brown and eggs appear cooked through.
This was our main course, so it only served four big pieces... And, I should have taken a picture before we dug into it. But, we were hungry - it was 9:00 p.m.! :) I'll make this again, and may even try it with different vegetables. It seems like any combination would work!

Creamy Italian Potato Salad
Mark was still in NYC, so the mayo continues! However, just because I like things made with mayonnaise doesn't mean I welcome all the calories... So, I tried something a little bit different.
Ingredients
1 1/2 pounds red potatoes, cleaned, and cut into quarters
1/4 c Italian dressing
1/4 c mayonnaise
1 hard boiled egg, chopped
3 green onions, diced
1 tsp minced garlic
1 tsp chopped fresh dill
1/4 tsp yellow mustard
1/4 tsp honey mustard
1/2 tsp lemon juice
salt & pepper to taste
Directions
Place the quartered potatoes into a large pot, and bring it to a boil. Once the water is boiling, cook them for 12 minutes, or until they are the tenderness you prefer. Drain the potatoes and set them aside to cool down.
In a large bowl, combine the Italian salad dressing, mayonnaise, egg, green onion, garlic, dill, mustard and lemon juice. Stir the cooled potatoes into this mixture already in the bowl.
This was creamy and delicious, and I felt a little less guilty!

Deviled Eggs With Green Onions & Garlic
Now that I've finally found the secret to hard boiled eggs, it is time to make deviled eggs... You can tell Mark was out of town that week, because it was mayo-pallooza at my house! (Mark is a strict anti-condimite, particularly of the white and creamy variety.)
Ingredients
6 hard boiled eggs
1/3 c mayonnaise (I used that olive oil kind with less fat, and didn't think anything was missing...)
1/2 tsp yellow mustard
1/2 tsp honey mustard
3 green onions, diced
1 tsp minced garlic
pinch of salt
hungarian paprika (Which is an awesome spice to have on-hand - I use it all the time!)
Directions
Cut the hard boiled eggs in half, longways. carefully remove the yolk from the whites
Place the yolks into a bowl and mix with the mayonnaise, mustard, honey mustard, green onions, garlic, and salt. Mix together to reach a creamy consistency, and spoon the mixture back into the egg white halves. Sprinkle paprika over the top, and enjoy!

Ingredients
6 hard boiled eggs
1/3 c mayonnaise (I used that olive oil kind with less fat, and didn't think anything was missing...)
1/2 tsp yellow mustard
1/2 tsp honey mustard
3 green onions, diced
1 tsp minced garlic
pinch of salt
hungarian paprika (Which is an awesome spice to have on-hand - I use it all the time!)
Directions
Cut the hard boiled eggs in half, longways. carefully remove the yolk from the whites

Place the yolks into a bowl and mix with the mayonnaise, mustard, honey mustard, green onions, garlic, and salt. Mix together to reach a creamy consistency, and spoon the mixture back into the egg white halves. Sprinkle paprika over the top, and enjoy!

Thursday, July 28, 2011
Parmesan Potatoes
As I mentioned below, I had an almost overwhelming amount of veggies to use so I was eager to get back and start cooking. I had about 3 weeks worth of potatoes that I needed to cook up, but I wanted to do something quick and easy so I could attend to my other veggies as well. This recipe (like all of mine) is very simple, and required few ingredients.
Ingredients:
Potatoes
Olive Oil
Parmesan Cheese
My massive amount of potatoes:

Preheat Oven to 400
Cut up potatoes and put them in a mixing bowl (in my case, it had to be pretty large). Put a little olive oil and mix up to make sure all the potatoes are oiled up. Place in a baking pan, and then layer on the parmesan (you can never have too much cheese, wine, or money in my opinion). Cook for 35-40 minutes, and enjoy. For those with a sophisticated palate, I highly recommend dipping in ketchup

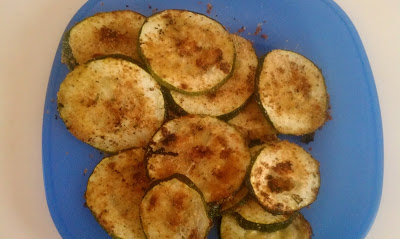
Zucchini Chips
So after being gone for a week and a half, I have a TON of veggies to use! Zucchini was one of the vegetables I had an abundance of, and I decided to try something new. I love my green bean fries, so I adapted the recipe for zucchini. It was just the right amount of flavor, and very yummy! It pains me to use my farm fresh eggs for just egg whites, so I used milk instead. Here it is:
Ingredients:
1 large zucchini, sliced
1 cup of skim milk
Italian bread crumbs
Preheat oven to 350
Dip sliced zucchini in skim milk and then place on greased baking sheet. Arrange chips on sheet and then sprinkle with bread crumbs. Cook for 10 minutes and enjoy!
Ingredients:
1 large zucchini, sliced
1 cup of skim milk
Italian bread crumbs
Preheat oven to 350
Dip sliced zucchini in skim milk and then place on greased baking sheet. Arrange chips on sheet and then sprinkle with bread crumbs. Cook for 10 minutes and enjoy!

Monday, July 25, 2011
Hard Boiled Eggs... There is a secret. For real.

When I found out our CSA was going to come with a dozen eggs each week, I first got excited about making hard boiled eggs, but then realized that was going to be a lot of hard boiled eggs... Abby and I split a share, and even half is a lot of eggs! We pretty much just take turns on which one of us takes the eggs. It doesn't help that Mark pretty much only likes eggs scrambled. But, this week he's travelling. So, all the good stuff with eggs and mayonnaise is fair game!
I actually did try to make hard boiled eggs with our first eggs. And, they were fresh and delicious, but I lost half the white to the shell. That was a serious bummer, because it meant they were not only half wasted, but they also would make the world's ugliest deviled eggs... And, it's partially about looks, right?
So, I asked a Chef friend for the secret to keeping the white off the shell, and he said it's all about old eggs... (Thanks, Chuck Friedhoff!) It never occurred to me that my eggs would be too fresh. So, I've been sitting on these eggs since 4 weeks now. Don't worry - farm fresh eggs are good 4-5 weeks from their pack date.
Since I aged them and didn't want them to ruin them, I wondered if there was more to it than just boiling... That's when I found this site.http://bit.ly/9oqSLH Man, does she love her eggs. Which pretty much told me all I needed to know - there is more to it.
In short - cover your eggs in the pot with cold water and a splash of vinegar. Put them on the stove, over high heat until the water boils. When the water boils, turn the heat to low for one minute, and then remove them from the heat. Cover and let sit for at least 12 minutes. I went 15. And, they are the most perfect hard boiled eggs I've ever made! All results not based on me, but thanks to the tips from both contributions!
Creamy Potato Salad with Radish, Dill, and Onion

Ingredients
5-6 Medium Red Potatoes
2 Medium Radishes
1 Tablespoon Dijon Mustard (I like French, not to be confused with French's)
1 Large Green Onion
1 Spring of Fresh Dill
1 Cup Miracle Whip
Pinch of Sugar
Salt
Pepper
Boil potatoes until soft and set aside to cool. Slice Radishes thinly and add to potatoes. In another bowl, mix Miracle Whip, one tablespoon of Dijon, a pinch of sugar and salt and pepper to taste. Chop up entire green onion (including greens) and sprig of dill. Add the dill and onion to the mixture and give it a stir. Once it is nicely blended, pour on top of potato/radish mixture. Mix thoroughly and chill for an hour. (or if you are like me, eat it warm because it's too amazing to wait)
Enjoy!
Sunday, July 24, 2011
Spicy Cuke Salad
In case you were wondering: still finishing up last week's delivery. With Abby and Mark both out of town, I am going to have to cook vegetarian to ensure #novegleftbehind happens...
However, Mark and I fell in love with the cucumber this spring in Costa Rica. At our hotel (really reasonably priced if you are considering going), they would keep filling your glass with cucumber-infused ice water while you lounged at the pool. It was heaven...
Anyway, we got a green cucumber and a white cucumber, so I started remembering that trip. And, that made me want to combine the refreshing cucumber with something spicy and Latin-American-ish...

Ingredients
1 medium green cucumber
1 medium white cucumber (Can't find this? Just use another green one. The taste is identical.)
3 small ears of sweet corn
1 medium-to-large tomato, diced
1/4 green bell pepper, diced
1/4 red bell pepper, diced
1/4 orange bell pepper, diced
1/4 yellow bell pepper, diced
1/4 small red onion, sliced
1 tsp minced garlic
3 tsp red pepper flakes
1/2 tsp cumin
1/4 tsp parsley
1/4 tsp salt
1/8 tsp pepper
2 Tbsp Red Wine Vinegar
Instructions
Bring a small pot of water to a boil on the stove. Add the corn to the boiling water and boil for 5 minutes.
Meanwhile, cut your cucumbers in half and scoop out the seeds with a teaspoon. Chop the remaining cucumber and add to a bowl.
Remove the corn and cut the kernels from the cobs and into the bowl with the cucumber.
Add the remaining ingredients to the bowl and toss with the Red Wine Vinegar. Chill for at least two hours before serving... Ideally, it's best when it's had a night to combine and soak into the vegetables. It's crunch, spicy, and somehow cool and refreshing at the same time... YUM! This would be perfect for a barbeque side...
Serves 6
Cabbage Carrot Potato Soup
We DID have a lot of cabbage... And, I love soup... So, this was a no-brainer. And, it's super easy and delicious.
Ingredients
2 Tbsp olive oil
1/4 of a medium head of cabbage, cut into cubes
4 carrots, peeled and sliced thin
1/4 red bell pepper, diced
1/4 green bell pepper, diced
1/4 yellow bell pepper, diced
1/4 orange bell pepper, diced
1/4 white candy onion, sliced thin
2 large red potatoes, halved and thinly sliced
2 Tbsp minced garlic
6 cups chicken stock
1/4 tsp dried thyme
1/4 tsp fresh chopped sage
1/4 tsp fresh chopped garlic chives
1/4 tsp fresh chopped flat leaf parsley
Salt & Pepper to taste
Instructions
Put a large soup pot on the medium high stove and add the olive oil to heat as it coats the bottom of the pot.
Add the chopped vegetables and sautee them until the potatoes and onions start looking tender and translucent, and the carrots have softened.

Add the chicken stock and remaining seasonings, and allow to simmer together for about 20 minutes.
You can serve this hearty vegetable soup just like it is. Or you can blend it for a creamier consistency. I blended it with a handheld immersion blender, and just left a bit of chunkiness. Serves 6.

I topped it with grated parmesan and croutons made from whole wheat toast. It was delicious, and it holds for leftovers. So good for you! We'll make this one again for sure!
Fresh Taco Topper
Tuesday is Taco Night at the Philip house, and this week was no different. I know that personal taco taste is subjective, so I'll just tell you how we made them in case you are curious. We used ground turkey (we're trying to minimize red meat to the occasional steak and burger). We browned it. We drained it. See why this isn't a recipe? Then, I added sliced red, green, yellow, and orange bell peppers and sliced red onion (probably about a quarter of each of them). Then, I start throwing things in: Cumin, Chili Powder, Sciracha, garlic, red pepper flakes, hungarian paprika, etc. Tacos never taste the same twice at our house... So, that's pretty much what you do with the meat.
Mark loves the double-decker... So, we use both flour and corn tortillas, warmed, and them cemented together with refried beans. In case you were really curious...
Here's the part I thought you might actually want to know. We had a lot of cabbage, and we usually top our tacos with tomatoes and lettuce. But, it seemed like a lot of restaurants do a cabbage topping, so I went for that... ...and this fresh taco topper was born.

(This is a terrible photo. I was really hungry at that point.)
Ingredients
1/4 medium sized head of cabbage, sliced thin (around 2 cups or so...)
1 small tomato, diced
1 green onion
1 tsp garlic chives
1/2 cup orange juice
1/4 cup fresh lime juice
1 tsp kosher salt
1/4 tsp cracked black pepper
Instructions
Combine all of the ingredients in a bowl and chill until you are ready to top your tacos. Serves 6.
The orange and lime juice combination was so refreshing on the spicy tacos... We went back for seconds.
Word of warning: This does not eat like slaw to me. I saved what was leftover to eat as slaw with lunch the next day. Not that tasty on it's own - maybe too much acid for my taste.
Mixed Bean Italian Salad
Last week, our CSA delivery came with a nice little surprise - a variety of beans! There were green beans, purple podded, and yellow wax beans included. So, immediately I was thinking of making a bean salad, but I also wanted to add kidney beans because I was thinking the colors would all be beautiful. (And, kidney beans are a super food...) I guess I must admit that I have not yet met a bean that I didn't like... So, if beans aren't really your thing, this may not be for you. But, if you are a fan of the beans, I loved this simple preparation.

Ingredients
1/2 pound fresh green beans
1/4 pound purple podded beans (Can't find them? They taste like green beans - just increase the green & wax.)
1/4 pound yellow wax beans
1 15 oz. can of red kidney beans (rinsed and drained)
1/2 cup Italian dressing (Choose your level zestiness like you would on your salad!)
1 Tbsp minced garlic
2 Tbsp red onion, chopped
1 1/2 tsp parsley (We had fresh flat leaf parsley in the delivery, but you could use flakes.)
1 tsp mixed fresh yellow rosemary and garlic chives (You could just sub italian seasoning, I'm sure...)
Instructions
Trim green, purple, and wax beans, and cut or snap into pieces roughly one inch. Place into a small pot of water (make sure the water covers the beans) and bring to a boil. Cook until desired tenderness, I like them a little crisp tender, so it took about 7 minutes once they were boiling.
This is where I had a bean buzzkill. The purple podded beans turn green when they cook. Boo... There goes my four color salad... Oh well. It's just another reason to not worry about finding the purple podded beans... :)
Drain the cooked beans and place them in a bowl, add the kidney beans and the remaining ingredients.
Cover and chill at least one hour - it takes some time for the beans to really soak in the dressing. It actually gets better as it ages. Serves approximately 6.
This is meant to be a cold salad, but I took leftovers to work the next day, and absent-mindedly stuck them in the microwave with my pork tenderloin. They were delicious hot, too...
Enjoy!
Saturday, July 16, 2011
Make Turnips Yummy!
So, we've been getting turnips for weeks through our Dry Dock CSA... And, so far, I've pretty much just put them over salads and slaws and not really paid much attention to them. Tonight I made them into Mashed Turnips, like you would make mashed potatoes. And, they were GREAT! No carbs, and you don't miss the potato at all. The consistency is great!
Mashed Turnips
Ingredients
8 small-to-medium turnips, peeled and quartered
2 leaves flat leaf Italian parsley, chopped
1 Tbsp skim milk
1 Tbsp butter
1 Tsp minced garlic
salt & pepper to taste
Directions
Boil some water in a medium pot. Add quartered & peeled turnips to the water and boil for 35-45 minutes. Remove and drain. Move the turnips to a blender, and add all other ingredients to the blender. You can vary the amount of milk, butter, garlic, salt & pepper to fit your tastes. Blend thoroughly in the blender and put back into the pot. Turn the heat to medium and stir frequently until the liquid from the turnips reduces to the consistency of mashed potatoes. YUM! Serves 2. No carbs!
(Also no picture. I'll fix this when I make them again! That's right - I will make this again!!!!)
Sweet Potato & Green Bean Gratin
This one was a real adventure. I'll be honest. If I make this again, I will add A LOT more cheese... So, think about a creamier cheese variety between the layers or just more of what I did. But, it was a little boring as it stands...
And, also, I almost mandolined my fingernail off. I seriously escaped with just a divot out of the middle, thanks to a timely manicure...
Just being honest. They aren't all home runs!
Sweet Potato & Green Bean Gratin
Ingredients
2 Sweet Potato (medium size), peeled and sliced
1/2 candy onion, sliced and carmelized
1/2 lb. green beans, trimmed and snapped
1/4 c. shredded cheddar cheese
1/4 c. grated parmesan
1/2 c buttermilk
2 pieces of bacon, crumbled


(Measurements on the cheese and buttermilk are not precise)
Directions
Preheat oven to 425 degrees. Grease or spray a baking dish to keep from gratin from sticking. Layer the ingredients in this order: sweet potato, green beans, carmelized onions, bacon, shredded cheeses, buttermilk.

When all layers are complete, place in the preheated oven and allow to bake about an hour. Remove from oven and let cool a few minutes before cutting and eating. Serves 9.
 Again, I would add more cheese than what you see here. And, I would probably heavily salt and pepper this on each layer if I made it again. I think it could really stand up to a stronger, creamy cheese. The bones are good, but it needs more flavor!!! If you improve this, please let me know what you did!
And, also, I almost mandolined my fingernail off. I seriously escaped with just a divot out of the middle, thanks to a timely manicure...
Just being honest. They aren't all home runs!
Sweet Potato & Green Bean Gratin
Ingredients
2 Sweet Potato (medium size), peeled and sliced
1/2 candy onion, sliced and carmelized
1/2 lb. green beans, trimmed and snapped
1/4 c. shredded cheddar cheese
1/4 c. grated parmesan
1/2 c buttermilk
2 pieces of bacon, crumbled


(Measurements on the cheese and buttermilk are not precise)
Directions
Preheat oven to 425 degrees. Grease or spray a baking dish to keep from gratin from sticking. Layer the ingredients in this order: sweet potato, green beans, carmelized onions, bacon, shredded cheeses, buttermilk.

When all layers are complete, place in the preheated oven and allow to bake about an hour. Remove from oven and let cool a few minutes before cutting and eating. Serves 9.

Zucchini & Yellow Squash Skillet
We finally got yellow squash in the CSA delivery a few weeks ago. I love zucchini & yellow squash in the summer, and it's one of the first vegetable side dishes I was able to convince Mark to try... And, he likes them! Bonus! Even though we've established that he likes them, I still like to give vegetables a little extra oomph from time to time. And, when I give oomph, that means I add bacon and cheese... This was delicious!
Zucchini & Yellow Squash Skillet (with oomph)

Ingredients
2 slices of bacon , sliced and quartered
1 medium zucchini, sliced and quartered
1 medium yellow squash
1 tsp minced garlic
1/4 red bell pepper, diced to quarter inch
1/4 red onion, diced to quarter inch
1/3 c shredded monterrey jack cheese
salt & pepper to taste
Directions
Place two slices of bacon in a large skillet and pan fry over medium low heat.
As bacon is frying, slice and chop the zucchini, yellow squash, garlic, red pepper and red onion.
When bacon is done, remove from pan. Pour the majority of the bacon grease out, leaving just enough to coat the pan. Add the chopped vegetables to the pan. Cook over medium heat, until the onions and squash become chopped and translucent. Turn heat to low, and crumble the two slices of bacon into the mixture and sprinkle the top with shredded cheese. Add salt and pepper to taste. Enjoy!
Serves 4
 The bacon grease really adds a nice richness to this side dish. We ate it alongside some homemade bacon cheeseburgers (so really I made more than the two slices, but you only need two slices for this dish!), and it was a great meal!
Zucchini & Yellow Squash Skillet (with oomph)

Ingredients
2 slices of bacon , sliced and quartered
1 medium zucchini, sliced and quartered
1 medium yellow squash
1 tsp minced garlic
1/4 red bell pepper, diced to quarter inch
1/4 red onion, diced to quarter inch
1/3 c shredded monterrey jack cheese
salt & pepper to taste
Directions
Place two slices of bacon in a large skillet and pan fry over medium low heat.
As bacon is frying, slice and chop the zucchini, yellow squash, garlic, red pepper and red onion.
When bacon is done, remove from pan. Pour the majority of the bacon grease out, leaving just enough to coat the pan. Add the chopped vegetables to the pan. Cook over medium heat, until the onions and squash become chopped and translucent. Turn heat to low, and crumble the two slices of bacon into the mixture and sprinkle the top with shredded cheese. Add salt and pepper to taste. Enjoy!
Serves 4

Wednesday, June 29, 2011
Healthy Green Bean Fries
The original recipe called for bread crumbs but since I am a low carb type of gal, I created my own bread crumb creation. They were still delicious and I can't wait to make them again and pair with a nice burger and who knows maybe a glass of red?
Ingredients:
3 egg whites
Almonds
Italian Seasoning
Green Beans
Preheat the oven to 425.
Put the almonds in a food processor and crush them up until they are basically crumbs. While crushing add Italians seasoning for extra yumminess. Whisk your egg whites and then add the "bread crumbs" into a medium bowl. Coat the green beans in the bowl, then lay the coated green beans on a foiled baking sheet that has been sprayed with PAM (so beans won't stick to foil). If you have any left over mix in the bowl, evenly drizzle over the beans. Put in the oven for about 12 minutes. Let them cool and then enjoy!

Subscribe to:
Posts (Atom)